The Undercut Racing Manager Call the undercut
Compounds, pit windows, and the live pitwall for Early Access.
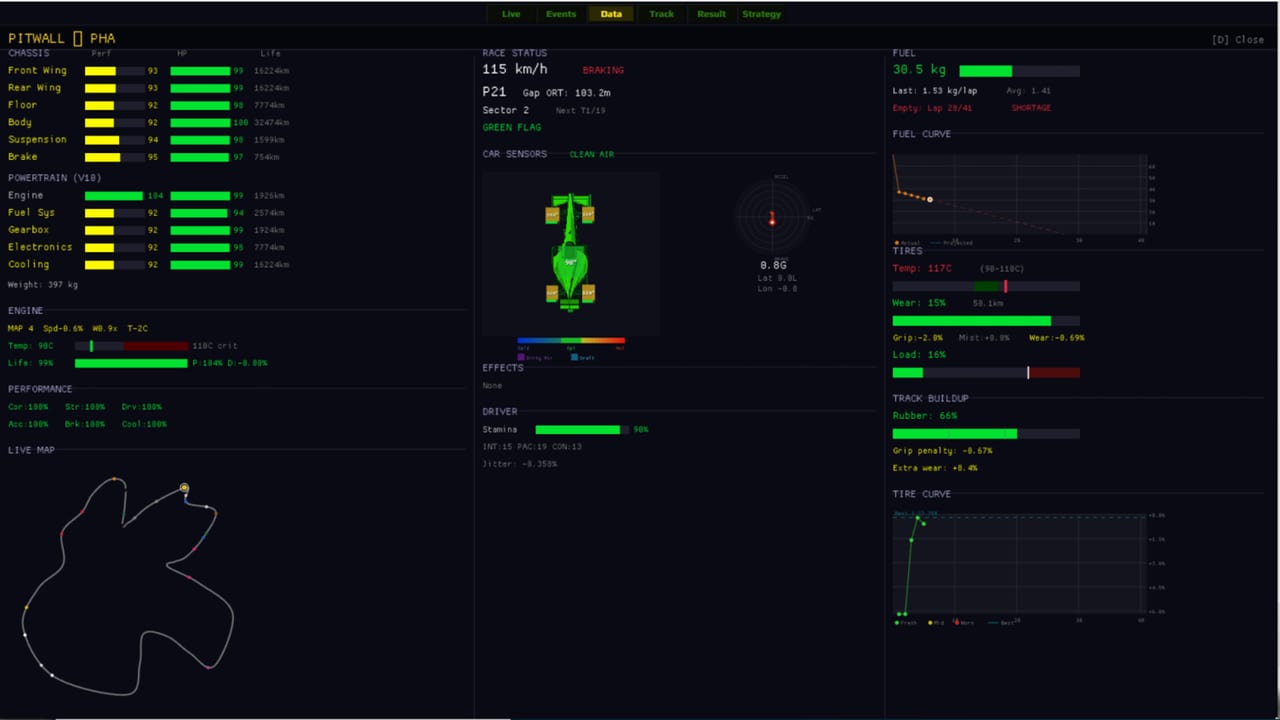
Race strategy is the name of the game and the mechanic people search first. The Undercut: Racing Manager simulates dirty air, drafting, tyre temperature, wear cliffs, fuel mass, and mechanical failures on a 2D physics engine. You do not win by picking a magic letter. You win by reading the compound sequence, the pit-loss of this venue, and the tyre state of the car you are trying to pass.
If you have not finished a weekend yet, start with getting started. Keep the pit strategy tool open as a short checklist. Hidden part traits that change drag or heat belong in car development.
Soft and Hard only
The live game uses two compounds. Medium exists in leftover code and does not appear on current plans.
- Soft — about +1.5% speed, 1.5× wear, warms fast, overheats in dirty air and hot calendars. Pace bonus is strongest in corners, weaker on straights.
- Hard — about −1.0% speed, 0.7× wear, slow to temperature, wide window. The long-stint tyre.
Wear is not linear. Green scrub-in, a long optimal plateau, a degradation slope, then a cliff past roughly three-quarters worn. Punctures ramp hard past 90% and are guaranteed at 100% in live sessions and Quick Sim after the 0.5.3 tyre pass. Running dry is a DNF. There is no auto-pit for fuel; you get one radio warning per stint.
Qualifying is almost always Soft. Race compound choice follows stint length, heat, and whether you are attacking or defending. Low-consistency drivers belong on Hard for the long stint; high-intelligence drivers survive Soft cliffs better. Match that to driver traits.
A, B, and C are a ranking
The generator builds shapes — one-stop Soft then Hard, one-stop Hard then Soft, and a two-stop only if it is competitive — then sorts them by estimated race time and names them A, B, C. A is the fastest estimate, not the aggressive plan. On a low-degradation track A is often a one-stop. A two-stop is dropped unless it sits within a small time window of the best one-stop, because an extra pit is roughly twenty seconds you must earn back on fresh tyres.
0.5.3 rebuilt the run-plan screen: tyre life, projected lap time, pit laps, and a fuel bar with +N kg labels, all drawn to scale from your practice wear and fuel, not a theoretical table. Custom plans let you set stop count, compound per stint, and exact stop laps. The AI respects a custom plan. Quick Sim honours it. If you build a fantasy two-stop the car cannot sustain, the cliff will still eat you.
How to undercut
An undercut is pitting before the car you want to pass, fitting a faster compound (or a much fresher set), and using the out-lap plus the next flying lap to jump them when they stop. It works when:
- Their tyres are in the degradation slope or worse.
- Your pit-loss is not a long-lane disaster.
- You can come out in air that is not a train of dirty-air cars.
- The out-lap penalty — cold tyres and brakes for the first stretch — will not dump you into a pack.
The AI may pit you a lap or two off the printed plan to take an undercut it likes. You can also press Pit yourself. A manual order beats the plan; the AI will not undo it. Use that for a delamination warning, a Safety Car, or an undercut the estimator did not see.
The overcut is the mirror: stay out on tyres that are still in the window while the car ahead pits, stretch the stint, and cycle ahead when they serve the stop plus the out-lap. Overcuts win on Hard in cool air when the Soft cliff would have punished an early stop.
Safety Car, fuel, and emergencies
A Safety Car in your pit window is a cheap stop because the field is slow. The launch AI is less greedy: if you are in the points, the tyres can finish, and a rival sits close behind, it may refuse the free stop so you do not gift the place. Backmarkers still take it.
Emergencies override the plan:
- Fuel — only if you genuinely cannot reach the flag.
- Tyres — very high wear with laps still to go.
- Crash damage — limp in; the strategy is over for that car.
Engine cooling is a real lever in 0.5.3. Overheating degrades the engine instead of bricking it in one session. In-race malfunctions last long enough to matter. Pushing a wounded engine to hold an undercut is a choice, not a default. Car development is how you reduce how often that choice appears.
Live pitwall habits
The timing tower is clickable: select a car to follow. Minimap dots show position. Overtake Push stays on until you turn it off; the sim will not quietly reset a player car’s engine map. Team orders — stay behind, let pass — exist for the second car. Use them when your own undercut would put teammates in the same piece of dirty air.
Watch tyre temperature versus wear. A Soft at 97°C with 8% wear is a weapon. A Soft at the same temp with 80% wear is a puncture warning. Fuel kilograms on the bar are not decoration; the floor is a real minimum load.
If you prefer data to broadcast view, the Data tab is the same race: part health, dirty-air state, fuel curve, tyre grip. That screen is why some principals sim at max speed and only pause for pits. Either style is valid after you have watched one race at 1×, as the getting started page asks.
Track and calendar context
Hand-curated circuits in the launch pool have identities: tyre wear high, overtaking difficult, pit lane long or short. The circuits guide is the map for those labels. A tight street venue makes qualifying and the one-stop more valuable. An open tyre-shredder makes the two-stop and the undercut more valuable. World series in the background do not change your compounds, but they do change the driver market you raid at GP-10. That is a scouting problem, not a tyre problem.
Weather is not fully in yet. Dynamic weather and rain are headline update one on the roadmap. Until that lands, climate on the calendar card (dry versus temperate, heat) is the thermal story. Do not plan a rain tyre you do not have.
Practice is the strategy document
Plans A/B/C are sized from practice. If you skip practice, you are racing on a guess. Use practice stints to:
- Confirm which compound actually lasts on this layout with this car.
- Record fuel per lap so the +N kg labels are honest.
- Advance trait investigations so a High Drag floor does not ambush stint two.
Then lock the plan. During the race, change it for traffic, Safety Cars, and cliffs — not because the letter felt unlucky. For a printable short form, use the pit strategy tool. For who belongs in which seat on a two-stop, see the driver tier list.
Frequently Asked Questions
Quick answers for pitwall decisions, scouting, and career systems.
Is plan A always the two-stop?
No. A is the fastest estimate. Read the compounds on the card. The pit strategy tool repeats the ranking rule.
How do I force an undercut?
Hit Pit on the live pitwall. The manual order beats the AI plan. Do it when the rival's tyres are falling off and your out-lap will not dump you in traffic.
Why did I puncture at 70% on the gauge?
Older builds double-counted Soft wear. 0.5.3 fixed the gauge. Trust the launch build: the cliff and puncture window sit near the end of the bar. See 0.5.4 notes.
Should both drivers run the same plan?
On GP 1, yes. Later, split strategies when you have a points car and an attacking car. Team orders on the controls page keep them from racing each other.