The Undercut Racing Manager First career in The Undercut
Wizard, desktop, and lights-out for Early Access 0.5.4.
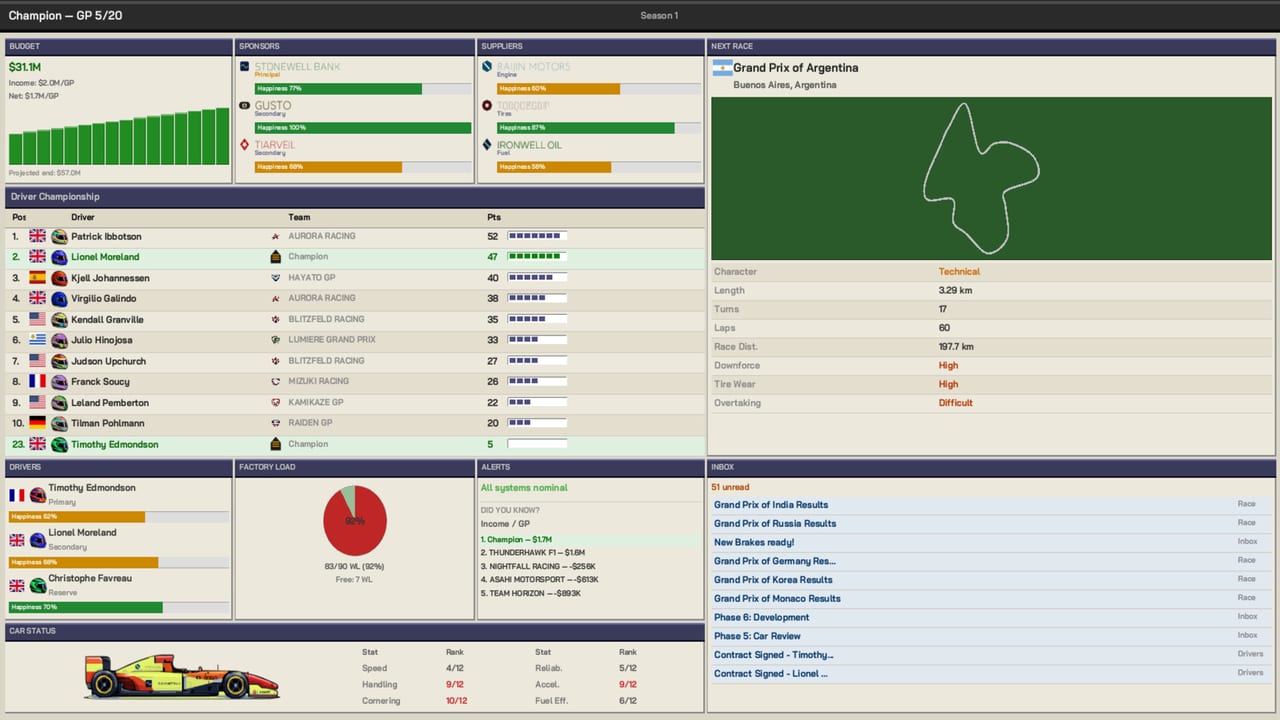
The Undercut: Racing Manager drops you on a 1990s pitwall with a full career already generating behind the desktop. There is a voiced tutorial, rebuilt in 0.5.4 so it opens on pre-season instead of touring every sidebar app. Use that walkthrough, then come back here for the decisions the tutorial cannot make for you: budget tier, which sponsors to chase, and which run plan to lock before you have practice data.
This page is the on-ramp. After it, keep controls and race strategy open. If you want the design argument for buying the sim at all, read the review.
The new-career wizard
Pick New Career. The wizard is short and the third screen is the one that matters.
Team name prints on the logo, the news, and the standings. Choose something you can live with; renaming later is awkward.
Country sets the flag and biases the driver pool toward that nationality. It does not add lap time. It does make home drivers cheaper and more willing to listen, which stacks with the country bonus on offers described in scouting.
Budget tier is the real fork:
- Small — tight cash, reputation around 30, mostly rookies, secondary sponsors only at the start. One ruined weekend can end the season.
- Medium — comfortable cash, reputation around 50, a mix of rookies and journeymen, some Principal brands reachable. This is the first-career pick.
- Large — spacious cash, reputation around 70, the full pool including stars, Principals from day one. Easier, and it skips the climb that makes the economy click.
Driver country preferences are cosmetic sliders on the generated pool. Logo and livery can be edited later; a clean body colour still helps some sponsor matches.
Confirm and the world rolls: a full calendar, sponsor and supplier pools, rival constructors, and a baked-in primary plus secondary driver. Circuit choice — hand-curated layouts versus the legacy procedural generator — lives in Settings → Career for new saves. Hand-curated is the default in 0.5.3 onward; about seventy unique venues ship at launch.
Hub orientation
You land on a Win95-style desktop. Icons open apps: My Team, Cars Overview, Calendar, Finance, Drivers, Suppliers, Sponsors, Infrastructure, R&D, Competition, Mail, News, Settings. The taskbar holds the date. Next GP on the right is the gate into a weekend. Mail can block that button; read it.
0.5.4 rebuilt the tutorial so the welcome card shows the two title-bar buttons it talks about, and an end-of-turn note reminds you that nothing is spent until you end the turn. That last point saves careers. You can queue repairs, observations, and design projects, then back out. The spend hits when the turn commits.
Day-one checklist
Do these in order. Fifteen minutes, then you are allowed to race.
- Read the mail. Sponsor drafts, driver welcomes, supplier intros, and the season calendar now arrive as one mail rather than a stack of eighteen. Action mails can gate Next GP.
- Sign sponsors. Aim for one Principal if reputation allows, then fill Secondary slots. Happiness is a contract, not a vibe: miss targets and they walk. 0.5.4 shares brands across single-seaters, touring cars, and GT, and the catalogue is larger. See the Drivers hub for how reputation and results feed the market.
- Sign suppliers. Engine first (power and the part you cannot manufacture), tyres second, fuel last. One of each category. A weak tyre deal makes Soft cliffs arrive early; that is a parts problem as much as a strategy one.
- Inspect the lineup. You start with a primary and a secondary. Stats stay blurred until scouting knowledge rises. Do not fire after the wizard because a single overall number looks average. Ride year one unless a red trait is already confirmed.
- Open the calendar. Note climate, corner count, and whether the next venue is a tyre-shredder. Long races create strategy variance; short races make qualifying the whole weekend.
- Leave infrastructure mostly alone. You start at level 1 across the generic departments. Upgrades are pre-season only for the player. Keep a cash buffer. After 0.5.4-1, nothing leaves the budget until you end the turn — you can nudge levels and undo for free. Car development explains why Marketing and Engineering beat a panic Aero buy.
GP 1 weekend
Press Next GP when the inbox is clear.
Weekend loadout now caps the spare truck and remembers your last selection. For GP 1, ship the race cars plus obvious wings and a gearbox. You do not have a drawer of prototypes yet.
Free practice can be simulated or run live like a qualifying session. Live practice is how you discover hidden part traits. For a first career, a single honest run plan is enough: measure wear, measure fuel, and let the trait gauge tick. 0.5.3 made discovery about forty percent faster and grouped investigations by kind. Practice data belongs to the car, not the driver, so a seat swap does not throw the numbers away.
Qualifying. Soft compound, multiple stints inside the thirty-minute window, hot-lap stepper if you are running it live. Grid position decides a huge slice of race outcome. Do not skip it.
Race run plan. You will see up to three candidates plus, in 0.5.3, a Custom button. Read the compound sequence printed on the card. A is whichever plan the estimator ranks fastest on this circuit with this car — it is not automatically a two-stop. For GP 1, pick the one-stop the estimator likes, usually Soft then Hard, and lock it for both cars. Details live in race strategy.
The race. Watch the first one at 1×. Engine map around the middle. Do not mash Overtake Push for forty laps. Call a manual pit only if tyres are past the cliff, fuel cannot reach the flag, or a Safety Car opens a cheap stop. Crashes can now injure a driver for one to five Grands Prix; the reserve steps in. That is new in the launch build, and it is why you keep a third seat warm.
Debrief. Read prize money, championship swing, and the repair triage. Queue obvious damage. 0.5.4 raised race and championship prize money by twenty percent, which makes finishing in the points a real finance lever instead of a ribbon.
After GP 1
Before Next GP again: spend Work Units on repairs, check Finance for net per GP, and read sponsor objectives. Factory performance in 0.5.4 finally matches the display — a weak factory no longer shows a zero car with more development room than a great one. If the car is a mule, you are not crazy; the factory is.
Common holes to avoid: spending the entire starting budget on facilities; signing only Principals you cannot satisfy; treating letter A as aggression; auto-piloting qualifying; firing a driver after one DNF; ignoring reliability while chasing peak pace; closing the window with Alt+F4 before 0.5.4 (that bug is fixed — closing now saves — but manual saves before risky calls are still sanity).
When you want a second career, finish the season first. End-of-year events, academy rollover, and supplier politics are part of the lesson. Then try Small if you want the hard climb, or a different country if you want a new driver market.
What to read next
- Controls — pitwall, Deck, pause menu.
- Race strategy — undercut windows and compounds.
- Car development — departments, Work Units, hidden traits.
- Scouting — do not sign on fame.
- System requirements — if the Deck or a laptop is the plan.
- 0.5.4 notes — what actually shipped with Early Access.
Frequently Asked Questions
Quick answers for pitwall decisions, scouting, and career systems.
Which budget tier should I pick first?
Medium. Small punishes one bad weekend. Large skips the economy that teaches you sponsors and facilities. Details are in the wizard section above and the review.
Can I skip practice on GP 1?
You can simulate it, but you will miss trait kilometres and wear numbers the run plan now sizes from. Live or sim, do not enter the race blind. See car development.
Should I upgrade infrastructure before the first race?
No. Keep a cash buffer. Player facilities freeze in-season. Spend after a few prize-money weekends, using the order on car development.
Where is the official trailer?
On the home page and the free demo page. It is Staz.Tech's Early Access trailer, not a third-party let's play.